Showing posts with label leafs. Show all posts

Tuesday, December 27, 2011

More hand carved stamps!


More hand carved stamps! Some of them were in the advent calendar for my little (not so little anymore, she is a head higher than me! ^^) sister Lachafa. Others are just some leftovers of the rubber I used for carving... with which I played a little bit :)

Leaves were included.... of course!


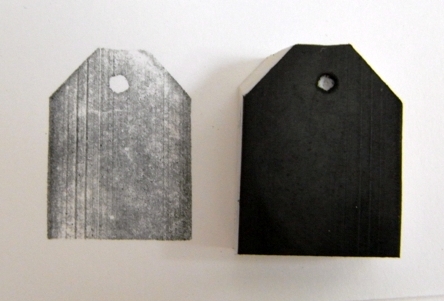
And a tag! Everyone needs a tag stamp, nai?


I really like how the lines of the rubber get a more interesting texture to the stamped image (for this one I used  normal school erasers so therefor the surface is not perfect sometimes for printing, but I love the effect! :)).

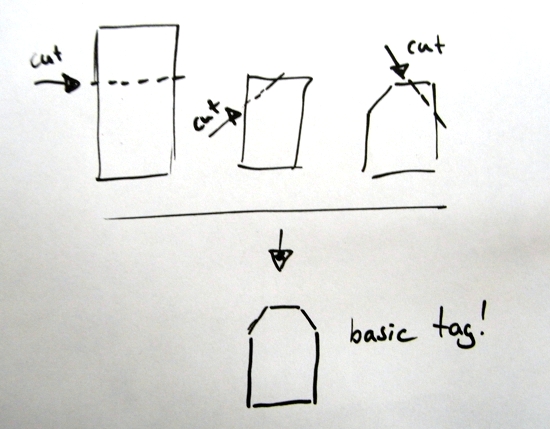
You want your own tag stamp? Nothing is easier to carve than a tag stamp, really! Have a try! 

All you need is:
  • some eraser / rubber
  • a sharp knife / paper knife / scalpell / linoleum carving tool or just a tapestry cutter (just the sharp blade is important)


And here are the little stamps I made out of leftovers... we are talking of 1 cm stamps or smaller ^^

Not much is needed for a house shape...!


Squares create great pattern, especially if they are NOT perfect :)


What about more squares, triangles or other shapes?


Tuesday, October 11, 2011

Just another small teaser...


...as a kind of a life sign. This one belongs to some stamps which shall fly over the ocean soon :)

Tuesday, May 10, 2011

Still carving leftovers of the print block...


One of my favorite quotes... now I should just start to live up to it ^^

Da es sehr förderlich für die Gesundheit ist, habe ich beschlossen glücklich zu sein.

I decided to be happy, it is excellent for one's health.

J'ai décidé d'être heureux, c'est excellent pour la santé.

                                                                                               (Voltaire)


And also a little leaf.... and a second insect wing :)

I glued the quote stamp on an old wooden stamp handle (without the original rubber).

While carving I am mostly using just two blades: One straight with a sharp point and a v-shape lino cutter. If there are rules I am following it would be mostly this three:
  • always cut diagonal to get a broad base for the motif (1 / 2)
  • outline the motive first (v-shaped blade) (3)
  • always cut inner corners from the inside out (4)


This is the v-shaped blade of my lino cutter. Mostly I am using it to carve the outlines of my drawing.


I am just using the point of my paper knife or scallpel to cut in the corner. 

Tuesday, January 18, 2011

Inspirations: Strange new years flowers... (Leipzig)


I took this pictures at the first day of this year... This is some strange colour powder or something like this from fireworks. All the spots of this very bright colours seemed so strange between the snow and the barren trees.

I know it was a little bit quiet in my blog the last few days. There are some changes in my life at the moment, some things which are not easy and although I have to make stuff to keep me sane ^^ there is sometimes not enough left from the day (or my energy).

But I'll try to change this again (for my own sake) :)


Thursday, January 6, 2011

Inspirations: Material (Paperstuff + tags)


This blog entry is a little collection about the materials which inspires me and in this case especially about paperstuff. You can see in the first picture a lot of the small paper items I am making. I just tried out several things like stamping with black ink on colourful backgrounds or painting on these backgrounds or putting an picture with adhesive tape on it (have a look here for how I am doing this :) ).

The most important thing is the paper I used.

This was made with artistic water colours. I just paint a lot of green and blue colors in stripes next to each other and afterwards put some silver on top. Nothing more...


Here the whole paper.


You can do this with a lot of colours...


...and if you add salt (really just normal salt nothing special) on top of the still wet water colours you get this effect!


I have quite often now coloured my papers with coffee (like here) but now I tried a paper tissue. The cool result is that after drying it doesn't get so hard like normal paper but remains some of it softness. Therefor it may be useable for a lot more crafting projects than normal coffee coloured paper.


After drying I wrote a little bit with a white laquer pen in it. I love the effect!


I get a lot of this cardboard. It was used as packaging material and it is really easy to work with. It is about 1 mm thick and I use it also for postcards and things like this. Not so stable like the cardboard I used for my filofax page one but comes close (although that cardboard was also old packaging stuff). I was a little bit beside myself therefor I decided just to cut out a lot of tags.

You know, I am still waiting for my "Verpackungslizenz" something like a packing licence where you pay for the disposals of all the stuff you are using for packing and stuffing. You need one in germany if you want to sell thing... Besides all the other licences and stuff... and it is expensive. There is no difference whether you are selling a little bit of stuff beside your other livings or if you are a big company. Same application... (No, I don't have more than 1000 employees... and so on). Mmpf....


But as soon as I get my licence I'll open my little tentacle shop ^^ So being not in a very creative mood but still have my last year resolution to do at least a tiny thing a day, I though I could make a lot of tags. For the things I may sell one day (hopefully) or just to have some at hand for wrapping of gifts.

I cut out a lot of shapes freehand and punched little holes into them. I don't thing that the shapes have to be even. In the opposite... there is something more appaling for me in the little imperfections.


I glued black cardboard on some. For the black cardboard with the writing I just wrote with a white laquer pen on a bigger sheet and cut them afterwards. Yes, there is a meaning but I don't thing that ever again it could be deciphered ^^

On some other I started just doodling around with my pen...


Or I used the wrapping of the big Lindor balls from Lindt (Yes, I am addicted to them!). The red ones are from the Lindor with milk chocolate and the black ones from the Lindor with dark chocolate. I am not too much into milk chocolate it's too sweet for me but my exception for this is Lindor! (But still prefer the ones with dark chocolate ^^).

I cut out the pieces from the wrappings I liked and glued them down with double side adhesive tape.


...and then I doodled more...


...and more...


At the end I even made a little plastic flower (like these ones) and glued it onto one tag.


Sunday, August 8, 2010

Never enough stamps!


This new stamp collection from today is somewhat incoherent... I hope you may forgive me for that! It was just in some minutes in between that I made this or that out of leftovers... there wasn't anything specific on my mind...

So what do we have?

A little star, some words, ornaments... and an island! The shape of Formentera! Okay, I think I will redo it with a different kind of rubber but for a first try it is sweet :)

The grey background was stamped just with another eraser leftover... probably will transform into a smaller stamp sooner or later! But before that it can be used for stuff like this. :)

And please: Just give me suggestions what could be transformed into a eraser-rubber-carved-stamp!

Sunday, September 6, 2009

Sonntägliche Bastelsession (dominical handicraft session)

Dieser Blog soll vor allem für Lachafa und mich dazu dienen, ein wenig von unserem Gebastelten zu zeigen. Bei jedem Bild sollte man sich dafür auch vorstellen, wie gerade mit halb quitschender Stimme gesagt wird: "Schau mal!"

Diesen Sonntag haben wir es wieder geschafft zusammen zu finden, bei Kaffee (ich), Orangensaft (Lachafa), Chaos und Familie! Vielen Dank an das Essen @Tophino! :)

Als Anlaß diente das Buch von Christi Friesen "Welcome to the Jungle". Mehr zu ihr findet ihr unter: http://www.cforiginals.net/

Ich hab dieses Mal vor allem an einem Hochzeitsgeschenk gearbeitet (die Mutter der besagten Nähhilfe beim Katzenkissen heiratet und ich bin als Brautjungfer dabei). Einem Bilderrahmen, Foto kommt dann noch dazu.

Der kleine blaue Frosch, der auf einem der Bilder mitten im Bilderrahmen sitzt, wurde extra gemacht. Nur als kleiner Größenvergleich ;) Die Bilder sind leider sehr unterschiedlich von den Farbe, da sie entweder mit Blitzlicht aufgenommen wurden oder eben mit normalem Raumlicht. Aber ich denke, man erhält einen Eindruck der wahren Farben. Bei Gelegenheit wird mal ein zusätzliches Bild bei Tageslicht gemacht (sollte es nicht vorher doch schon verschenkt worden sein...).


Wie man sieht, ist leider nach dem Backen ein Blütenblatt unten abgebrochen, aber das wird dann nochmal mit Sekundenkleber befestigt. Sekundenkleber werde ich auch generell noch unter einige Stellen zur Sicherheit fügen, daß ja Fimo sich nur gerne mit Fimo verbindet und somit die Gefahr bestünde, daß all die Blätter vom Glas fallen.