Showing posts with label ornament. Show all posts

Tuesday, December 27, 2011

More hand carved stamps!


More hand carved stamps! Some of them were in the advent calendar for my little (not so little anymore, she is a head higher than me! ^^) sister Lachafa. Others are just some leftovers of the rubber I used for carving... with which I played a little bit :)

Leaves were included.... of course!


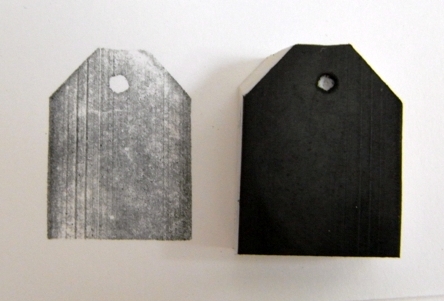
And a tag! Everyone needs a tag stamp, nai?


I really like how the lines of the rubber get a more interesting texture to the stamped image (for this one I used  normal school erasers so therefor the surface is not perfect sometimes for printing, but I love the effect! :)).

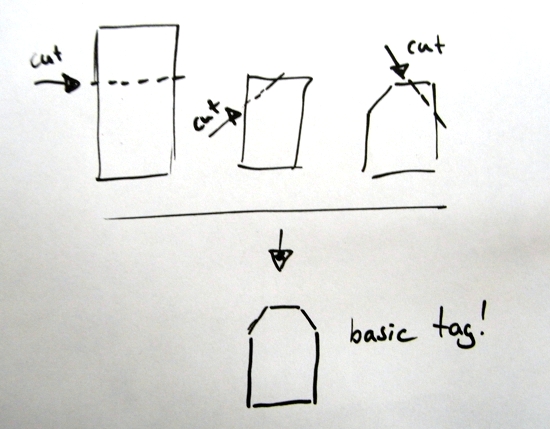
You want your own tag stamp? Nothing is easier to carve than a tag stamp, really! Have a try! 

All you need is:
  • some eraser / rubber
  • a sharp knife / paper knife / scalpell / linoleum carving tool or just a tapestry cutter (just the sharp blade is important)


And here are the little stamps I made out of leftovers... we are talking of 1 cm stamps or smaller ^^

Not much is needed for a house shape...!


Squares create great pattern, especially if they are NOT perfect :)


What about more squares, triangles or other shapes?


Friday, November 4, 2011

I never showed you this stamps!


As you see this are really basic stamps. I made them all from the rubber of normal school erasers )the really cheap ones ^^). I like the random background / muster stamps and I think there is always a need for a lot of arrow stamps! Don't you think so? And tags... no one should ever forget tag stamps! 


And a little castle... and a tiny house... and just a square. But sometimes you need a square! And don't forget I am just using a black ink pad to test and show the stamps. I think a lot of them would be quite cool in a lighter colour to create some kind of background texture.


I am really sorry I forgot to take pictures how I carved the stamps. I wanted to because especially a tag or an arrow is quite easy to do even for your first own handcarved stamp :)


Tuesday, May 17, 2011

Out of the molds...


At least the earrings I made with my new molds :) 

Some of them are made with polymer clay (fimo) and some like the molds with airdrying clay. 


I either used black polymer clay or painted them with black acrylic colour. 


Just to add the metallic effects also with acrylic paint. 


As I said... no sun! Therefore I had to use artifical light to get som pictures :(


I hope you get at least a little impression how they can shine in the light!


Sunday, December 26, 2010

The crow and all the colours!


My sister asked me whether I could make her pillows as christmas present(s). She know most of the pillows I already made as well as my love for making some (and having a lot of them on my bed!).

The first one is made with one of my crow stencils (have a look here or here). I cut the crow out of freezer paper, ironed this on the fabric and painted it over with fabric paint.

I made a pink crochet border... I like this border and thought it would be funny. A crochet border is a little bit old style but with the colours and the crow it has a more modern twist (at least I think so ^^).


It was hard work to sew with this wool because the needle was not really big enough. My fingertips are still hurting!

Afterwards I added a simple border of double crochet stiches (in german: Stäbchen) with my crochet hook (european size 4).


In made one double crochet stich in every needle stich. Only at the edges I put two double crochet stichtes in the needle stich sites. I just played a little bit until I found out which number of stichtes worked.


Yes, I had some problems catching the real colour... sighs. I haven't seen the sun now for some time and especially pink and violett are difficult to catch for my camera with artifical light. Just you know: The pink is a real pink! ^^


The next pillow was an easy one but I love the colours and the ornament! It was a textile bag I bought because I instantly feel in love with the fabric!


There was not enough green fabric for the back so I added some light blue which corresponds to the blue at the front. I am happy I had not enough green fabric because I love how this turned out! And I used red thread! Just a little touch of another contrasting colour but again: I love it!


And the third pillow: With a lot of circles made out of felt! I don't know how long this will last but I think the look of the pillow is worth a try ^^


I just cut out a lot of little circles, glued them on with fabric glue (never again, it will get a little bit to hard... they said it wouldn't get hard at the store.. sniff... quite happy that  didn't use much!) and afterwards stichted over them. Takes some time but won't be my last one!

It made a lot of fun to arrange all the circles on the fabric. :)

Tuesday, August 10, 2010

"Big one" scorpionfish card and more stamps...! ^^


The smaller one is stamped, the bigger one is the digitalised version of the smaller one turned in black and white colours and printed. Afterwards a little bit coloured with water colours (also just black and white ^^). I think the colour of the smaller one should be a different so it would stand out a little bit more. Although in reality it does... but... mh... still not enough I think.

But suits to my small colelction of pics standing againts my wall on the little rack. It is only temporary... either until I use them as mail or as they go into some kind of frame for my ever growing wall of stuff... or just to be stored somewhere safe.
 

And of course, I had to do something with the leftovers of my last bigger stamp (the scorpionfish ^^). A wee bird, birds prints and some wood. I had to attach a little piece of wood (the end of a pen) to the bird food traces otherwise stamping gets really, really difficult (or messy). Have to find something for the wee bird also...


A small dragonfly...


I don't know what but may be cut and / or useful ^^


And of course new variations to create papers! This one below I used for the "Big one" card above! Just paint with some wax crayons on sandwich paper, put another sandwich paper above (so you will get two nearly identical papers!) and iron it! The wax crayons will melt and create this nice "crinkle" effect. The second layer of sandwich paper is also to protect your iron.


Also cool with wax crayons and sandwich paper: Paint with the wax crayons on the sandwich paper, afterwards you drop candle wax (I used tea candle wax) on the sandwich paper. Wait until the wax i hard again and the just use a hard brush and take the wax drops of. It is very easy and the tea candle wax will take the colour of the wax crayons with it!


Sunday, August 8, 2010

Never enough stamps!


This new stamp collection from today is somewhat incoherent... I hope you may forgive me for that! It was just in some minutes in between that I made this or that out of leftovers... there wasn't anything specific on my mind...

So what do we have?

A little star, some words, ornaments... and an island! The shape of Formentera! Okay, I think I will redo it with a different kind of rubber but for a first try it is sweet :)

The grey background was stamped just with another eraser leftover... probably will transform into a smaller stamp sooner or later! But before that it can be used for stuff like this. :)

And please: Just give me suggestions what could be transformed into a eraser-rubber-carved-stamp!

Wednesday, February 17, 2010

Stamps - mounted!

I got really great pieces of wood to mount my stamps made out of foamed rubber. The bigger ones got knobs to handle them while stamping! And all of them were sanded so smoothly that you could create a vacuum on a plain surface!

I tried several methods for mounting the stamps like to glue them directly on the wood or with some plastic foil in between. Just to try what would work better...

In one case I glued the stamp on the wrong side.. *sniff* Just realised it viewing the pictures. Tomorrow I will fix it but not tonight anymore... really to late. Again.


You see the rest of the blue colour I used for testing? Although I washed the stamp some paint remains. But doesn't seem to rub of if used with a differend colour (tested it with some leftovers of the foamed rubber)...


I marked the direction (oben = this side up / rechts = right / links = left / Breite = width).


There are a lot more of them!

I really love them!