Showing posts with label book. Show all posts

Sunday, November 13, 2011

Homunculus


I forgot to put something in the pictures so you get an impression of the actual size: The little key or the foot of the homunculus are about 1 cm (ca. 0,4 inch). 

I made this one (and his book ^^) already some time ago as a birthday present for a friend. It is my first homunculus (or better to say: my first human-like work with polymer clay). 


Yes, the six fingers and finger nails on the hand are on purpose! You see his little earring?


And his little tail...


...all the scars and stiching lines (hey, he is an homunculus!)...


...a little skirt for modesty...


...and a big potato like nose!


I even like the effect of my finger prints on the surface...


The eyeballs are made with 3D laquer...


And I used a tiny wee bit of my own hair for him.


I just cut in the cured polymer clay with a sharp knife and afterwards used acrylic water paint which went into the lines. Otherwise they would have been invisible :)


And yes, I need a lot more of practice but for my first piece I like the result. :)


The little book is useable! I printed some tiny sheets with a strange language and some pictures which suits into the homunculus theme and glued and sewed them together. A little bit of acrylic water paint, some cardboard and silver leather for the book cover.. that was it! 


Sunday, June 26, 2011

Key ring notebooks...


I am sorry, I can't show you the other ones anymore. I sold them at my first market (and had no time to take pictures before. Finally sleep won the battle! ^^)

The sides are covered card boards. This one I made with a fabric I love... still have to try to make the edges a little bit better. 


From the side...


And beetles on both sides... this one is covered with paper...


...and all the books got several layers of laquer!


PS: I'll try to take better pictures at daylight. But somehow I only have time for this late at night... :(

Thursday, December 30, 2010

Tentacle note book...


...I nearly forgot to show you this one!

Of course, tentacles! It was a blank note book with a magnetic clasp. I just painted it black with acrylic paint. Over the black I added tentacles in white also with acrylic paint. I love the 3D texture you can get with acrylic paint! You can create effects although just working with one colour! I added some text with a white laquer pen. It says "TENCTALES... ...EVERYWHERE!!!"

Nothing surprising ^^

Afterwards it got a thick layer of high gloss varnish!

Sorry for the fotos... as you know, last minute shots with my digi just with electric light and no time to control ^^

Friday, October 1, 2010

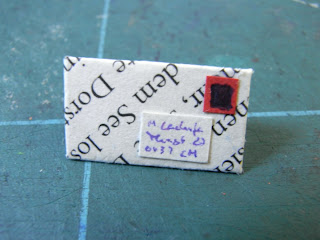
A little one - envelope


More mail art! This time the envelope is not to be send anywhere but as a decoration on a paper-clip. Although I am curious what the smallest size is our mail service would send. A stamp sized envelope? The stamp could be on one side and the adress label on the other... mh.. I will try it! Definitly!


The envelope is really useable in the meaning of having a card inside. There you could write down little messages if you would give one of these away as a gift.

I made the envelope out of one of my inchies I made out of book paper. Just a little folding of the edges. I cut the upper pieces of the lower edge. The upper edge goes over it quite nice. I hade some adhesive (one-side!) tape behind the three lower edges to glue them together.


A little piece of white paper for the adress label and a little bit of red paper as a stamp. I just scribbled over both.


And a little bit of red paper for as a card. "Read me" i think is suitable for a book mark.


Fits in! And I like that the first word is readable. It was not intentioned but I will keep this in mind if I make another one :)


I cut with my paper knife through the bottom of the envelope, put the paper clip inside with glue and let it all dry. During the drying time I left the knife inside the envelope so the clip would just be glued to one side of the envelope!


My label is on the other side of the red little card ^^


I think this would make a tiny but useable bookmark!

Tuesday, September 7, 2010

Book marks...


For the last day of another stamping challenge with the topoc: "book marks" I finished two versions. Yes, last day, last minute... as often with me ^^ But I used the book marks to test another technique of application for pictures. I did it with the dragonflys you see above on the book mark.

No surprise, I love the images of the graphics fairy. ^^ There are some images I just can't get enough from. So you will see some more ideas and stuff made out of them. This time I printed several images very small and cut the, out. Sometimes with a little overhang because this small it is not possible to cut them out easy. But not necessary. Some of the small images I put on the glue side of adhesive tape.


Just put the stripes with the images in hot water and let it incubate for some time. I don't know what the minimal time is because in between I worked on my thesis. But it was abound 45 minutes? Less time I think would also work.

But the cut out images itself, even without adhesive tape, makes nice envelop closer! Like a kind of a seal :)


After the incubation time in the water just take the stripes out and carefully rub the paper off the back. It is really easy but at your first attemp make some more just for getting used how much pressure you need and how much pressure would be too much.


Yes, I am changing images. I forgot to make pictures from every images to every step. But the all stand as example for eacht other. Below you see the moth after rubbing of the paper. The background will now shine through. I left a little bit of the paper inside the moth so sometimes there will be white spots. Getting the image a little bit more rough or shabby.


This is how it looks on a coloured background. I love it!

Monday, August 30, 2010

Toad - needle book


There is a lot of fabric stash owned by me. ^^ Leftovers from former projects or recycled fabric or or or... From such fabric scraps I made the top of the needlebook. Just one small stripe of red in the back as contrasting colour. The toad is made of different kinds of fabric paint. Normal one but also metallic effect paints or this fluffy-after-heating paint. I though that this would make the skin of the toad more suitable or to use another word. warty! ;) Blue ribbons for closure...


Inside a little bit of black nylon for elastic pockets and some grey felt to put the needles there. The opening of the pockets is to the inside so if they will be stuffed with thing the won't fall out if the needle book is closed. Hope it will function this way! You can see some of my batic dyed fabrics and some stamping with my carved tentacle or fish stamps.

There are a place for all kind of needles: Sewing needles, needles for small beads and of course dissection neddles (being a biologist, yes, this kind of needles also belongs in a needle book, just as a matter of principle!).


It is also with a thick layer of stuffing (like the one you use for quilts) so it is also useable as a pincushion. Oh, I forgot, there is also a place for pincushions in the book!


I already made it some days ago but it was a gift for a friend of mine :)

Friday, August 13, 2010

"Read me!" - little book stamp


A little stamp I want to use for creating some bookmarks. I like bookmarks instead of cards for little presents (like books... ^^). I just stamped up on my coffee dyed paper and cut it out to have some little pieces. Inchies!